Wednesday, May 24, 2017

Book of Shadows Signage v3.0 (part 2)

Continuing with the new sign for Book of Shadows project; we left off having added the copper foil trim to the background board...

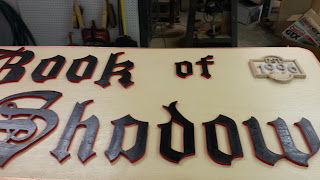
Now, having the letters painted and the background board painted and trimmed (and a coat of spar urethane), I was finally able to lay out the letters on the background board and see how it all looked.

 Once I was happy with the positioning of the letters, I glued each one down with some waterproof wood glue, and I also tacked them down with crown staples using my air nailer. To make sure I kept the positioning correct, I first traced around each letter with a pencil to make sure I could get it positioned right back where it was after applying the glue to the back.
I touched up the staple heads with some more black paint, and then I applied several coats of spar urethane to the whole board, letters and all. I made sure to get heavy coverage where the letters met the background board, to try to seal the seam as best as I could. I don't want water getting behind the letters and rotting out the wood.

SON of a BITCH! Looking at these photos, I just realized something. The 'A' in Shadows, is backwards. Son. of. a. Bitch! Well, there's nothing that can be done about it now. That sucker is glued down tight. Trying to pry it up would likely destroy the entire sign. At least the letter is so stylized that it is hard to notice. Anyway, that's what I'll keep telling myself for the next ten years while I'm looking at this thing- and only seeing the stupid backwards 'A'.    ...son-of-a-bitch.
 I need a minute....


OK- Moving on.  While I was busy not noticing the backwards letter, my eye kept being drawn to the negative space in the upper right corner of the sign. At first I liked it that way, but later I started thinking it needed something to balance it out. Since it was our 20th anniversary, I had been toying with the idea of incorporating something to commemorate the store's longevity somewhere on the building. I decided to try to make one of those plaques that say the year the business was established. I sized it to fit into the empty space in the upper right corner of the sign.

 I made the plaque out of scraps of plywood. The design was off the cuff, but it came together well. For the lettering, I printed out at 1:1 scale on the computer and spray glued the printout right to a piece of plywood. Then I cut the letters out on the band saw.  I used a piece of masking tape as a temporary "zero clearance" plate. A zero clearance plate makes the gap between the blade and the table very very small. This is especially helpful when cutting thin delicate pieces that could get caught and pulled down into the gap otherwise.

The lettering was glued down, and the paper was peeled off of them. Trim pieces were added around the perimeter of the plaque.

I set the plaque in place and played with the positioning to see if I was going to like it there.  I still wasn't sure about it, but I figured I would finish the plaque and think about it some more. I could always hang the plaque somewhere else if I decided I didn't like it on the sign.

After the lettering and trim was glued in place, the whole plaque got a primer coat of black exterior paint. 

The background was painted red, to tie in with the lettering on the rest of the sign. The lettering on the plaque and the trim were painted gold with metal leaf paint (hoping that it works out better than it did last time). I did my best to simulate the look of brass. I also added some small accent pieces to the sides, to give it more flair.

I pondered the inclusion and positioning of the plaque for a few more days, then finally I decided that I would go ahead and glue it down. 

 That's the main part of the sign. I could hang it just like it is, and it would be great. It would certainly be better than what is up there now. But I'm not quite done yet. Tune in next time, and we will get started on the accent pieces that will flank the main sign on either side.

See Also:
Book of Shadows Signage v3.0 (part 1)
Book of Shadows Signage v3.0 (part 3)
Book of Shadows Signage v3.0 (part 4)


.

Friday, May 12, 2017

Book of Shadows Signage v3.0 (part 1)

This project has been a long time coming. I started work on it about a year ago, and I intended to publish a post about it when the project was finished, but now I'm thinking that because it is a big project with multiple parts, and also because there is some concern whether or not it will ever get installed, maybe I should piece it out into a couple of posts, and start publishing them now.

My store, Book of Shadows in Canton Ohio, had its 20 year anniversary in 2016. It should have been a time of celebration and there should have been a big expansion and much ado, but because of personal stuff, it kind of came and went with barely a mention. One of the things that I had planned to do for the anniversary, was to make a new marquee sign to put on the facade, a really nice one. Since this location opened, it has had two marquee signs, both made by myself. Last spring we had a big storm and it damaged the current sign. The wood was starting to rot pretty badly due to weather exposure, and about a fifth of it got ripped down by the wind.

The building is about 20 feet wide, and the marquee is about six or so feet tall. Both of the previous signs were made from two full 4'x8' sheets of plywood (or paneling). The new sign will be a little smaller. It will be made from a single 4'x8' sheet of plywood that is centered, and flanking it will be two decorative scroll-work pieces and two large wall mounted carriage lantern style sconces.

The current aesthetic theme of the shop is sort of a Victorian parlor, with a few goth and steampunk touches. The color pallet is dark red and black, with a lot of brass and stained woodwork. The new sign is going to be raised black lettering, with red edges, on a sandalwood/beige background, with copper trim. The decorative scroll-work pieces flanking the sign will be black edged and clad in copper, and the sconces are brass.

Step number one in a project like this, after determining your scale and design, is to work up a scale image of your lettering, printed out on a grid, so it can be transferred to the full scale material. I chose a font and made a scale vector drawing of the full size sign, and scaled the lettering to fit on the sign the way I wanted it. Then I superimposed a grid over the image at what would represent 6 inch squares at full size, and printed it out for reference.

Next I drew a grid on my sheet of plywood, with six inch squares, using a straight edge. These are going to be raised letters, so they are going to get cut out of the plywood, and placed onto another background board. The grid is a common method of scaling images to be transferred. Using a grid makes it easier to free-hand the lettering, because you only have to concentrate on one square at a time, and it gives you reference lines to keep you on track. Just make sure that where an image's outline crosses a grid square line at a certain place on the paper, the same outline crosses in the same spot on the same square on the scaled up version you are drawing, and everything should turn out looking pretty close to the original. Using this method helps to make up for my lack of natural artistic ability.

Where there were letters of the same size that matched (like the two O's in BOOK), I only had to draw one of them with the grid. For the second one, I could just trace the first one after it was cut out. This cuts down on my chances for error, lessens a very tedious and stressful part of the job, and helps make similar letters look more alike.

After the letters were drawn on the plywood, I cut each of them out with a jig saw and/or the band saw. Then I traced any that needed repeated, and cut those out as well. The letters were of a scrolly gothic font, so cutting them out was a bit of a challenge.

Once all the pieces were cut out, I gave each of them a primer coat of exterior grade latex house paint (white). I hung each letter on a peg board in my father's workshop while the paint was drying. After the primer coat was dry, I used red spray paint to color the edges.

The faces of each letter were painted with black exterior grade house paint. Then, each was given a couple of coats of spar urethane to weather seal it. I'm making an effort to seal this sign against the weather as much as I can, in the hopes that it will not rot out the way the current one did. Though to be fair, that one did last for quite a few years.

While the letters were still loose, I traced them onto some chip board, just in case I needed to recreate them at the same scale for any reason. I wouldn't have to draw them over again. I will keep these sheets of chipboard for reference for a few years. If it turns out I don't need them for anything, I can always reuse the chipboard for something else.

While I was working on the letters I was also preparing the background board. I rounded the corners of another sheet of plywood and gave it several coats of a sandalwood/beige colored house paint. The back side that will be up against the wall got several coats of an odd maroon color, just to use up some old paint that would otherwise have no use, and because it will never be seen.

In an effort to spice things up and as a tie-in to the steampunk style, I wanted to add some real copper trim to the background board. I have tried metal leaf paint in the past, and it did not hold up to the weather, and it is very hard to capture the look of metal with acrylic paints. I have a roll of copper foil that I got on sale at the hardware a while back. It is meant to be used as a termite barrier, and it has an adhesive backing on it. But my past experience has taught me that the adhesive is unreliable, so I will have to strip it off and use another kind of adhesive to attach the foil to the background board.

Peeling the vinyl backing paper off of the copper foil was a nightmare. In small sections it is not so bad, but trying to pull it off of several feet at a time, sucked. I had to clamp the foil to the table, and pull the backing paper off while gripping it with pliers. The adhesive sticks to the backing paper quite strongly. It's a shame that it looses its grip over time when stuck to anything else.

I used Goo Gone and a putty knife to help loosen the adhesive while peeling the baking off. That helped. Then I had to use the Goo Gone to take off the rest of the adhesive from the back of the foil.

Once the foil was free from its backing and adhesive, I cut it into strips to be wrapped around the edge of the background board. In order to wrap around the rounded corners of the background board, I had to cut darts into the foil. 

The adhesive that I used to apply it to the background board needed to be flexible, very strong and waterproof. At first I tried caulking, but I had a hard time getting it to stay in place. It didn't have enough initial tack. I also thought it might peel from the non-porous surface of the copper foil after it was dry. So, I got a couple of tubes of E-6000. I have had good results with it in the past and it fits all my requirements. 

In order to keep the foil pressed tightly to the background board while the glue was drying, I used furring strips and many many spring clamps. I worked in sections, maybe four feet or so at a time. I tried to be mindful of how the joints overlapped. I treated it like metal flashing, always pointing the seam downward, to allow water to run off and not work its way into the seam or under the foil. I also made sure the edges of the plywood had several coats of spar urethane applied before the foil went on.

That will do it for part 1. More to come on this project. Stay tuned.

See Also:
Book of Shadows Signage v3.0 (part 2)
Book of Shadows Signage v3.0 (part 3)
Book of Shadows Signage v3.0 (part 4)


.
.
.
.

Wednesday, May 3, 2017

First Puzzle Box

So, December 2016 rolls around, and once again I find myself significantly lacking in both money and ideas for a Christmas present for my daughter, Isis. That usually means that I will end up making her something; which she will have little or no use for, but will keep it anyway because it came from me and was made with love (and because you can't return hand made gifts to the store- lol).

One of her favorite Christmas presents of recent memory was the year that I created a scavenger hunt type game for her. I hid about 25 or 30 small boxes in three different houses, each holding a little cash, or a small gift and a clue leading to the next box. It took her about eight hours, with her boyfriend helping, to find all the boxes. It was a lot of fun for both of us, but I always thought the puzzles she had to solve to find the next boxes were a little too easy. Of course she was only 17 or 18, and couldn't even drive yet, so I was a little limited. Also, she has a tendency to give up if things don't come easily to her; so I soft balled it a little bit.

Around the beginning of the month, I saw a YouTube video by Benno Baatsen showing off a puzzle box that he had created. I got the idea to buy the plans for the box from his website so I could build it for Isis' Christmas present, and inside I could hide some cash too. Then I got the idea to not tell her how to open it, and put a clue in it also. Then I could expand on the gift later, when I had a little more time and money, by putting another gift at a destination designated by her "clue". This plan buys me time- however long as it takes her to solve the clue to get to the next part. And this time, I would make the puzzles challenging- starting with the initial puzzle box.

The original puzzle box design I wanted to build required 42 moves to open. However, I ran into some issues with the construction and didn't think it was going to work out. So at the last minute (literally, like two days before Christmas), I decided to change to a completely different design, which I felt that I understood much better, and seemed like it would be easier to make (and probably to open as well).

I originally intended to make a prototype out of MDF and cheap wood scraps to work out all the kinks, and then make a final version out of nice wood. But of course I ran out of time, so the prototype ended up being the final version. The main body of the box is made from reclaimed 3/4" MDF and the mechanical parts are made from 1/4" hardboard and Luan scraps. By the time I got the main part of the box done, I realized that I would have to use the prototype as the final product, so I did use nice hardwoods for the decorative outer trim. I cut my own 3/4" edge molding from Chakte Kok (redhart), which was used along all the edges of the box, and I cut large disks of Spalted Maple for the face decorations.

Here is how it all went down-
Step 1- Cut six perfectly square pieces of MDF for the side panels. Then bevel all the edges at 45 degrees.

 Step 2- Glue the square panels together at the mitered faces to form a box. The box needs to be in two halves, three panels per half- in a "U" shape.

 When the two halves are slid together, they should form a cube, and if you are lucky, friction will hold it together and the seams will barely be visible.

Step 3- Drill a hole in the center face of one of the halves. You will need a round plug that fits into this hole and is the same length as the thickness of the face. I used a 1-3/8" forstner bit to drill the hole and a length of 1-3/8" oak dowel to fit into it. This is where the inside lock mechanism connects to the outside of the box.

 Step 4- Now for the internal locking mechanism. I won't go into excessive detail about the locking mechanism, mostly because the person who designed this box sells the plans on his website, and it would be pretty shitty of me to purchase them and then spoon feed them to all of you for free. The clever among you can probably piece enough of the design together from these pics that you wouldn't need to see the plans in more detail, but if you are interested in building one of these boxes, I recommend you buy the plans for yourself. They are just a couple of bucks.

 I cut the tumbler slots a little too wide, so I had to shim them with a cut down Popsicle stick.

 Here they are all shimmed up and with the tumblers in place. I made the tumblers from chopped up pieces of a large nail.

The locking mechanism is built in two layers- the tumblers, and the latch arm.

 I reinforced my latch arm with a bent piece of steel (a nail) due to the fact that the sides are made from heavy MDF and the latch arm is only a thin piece of luan.
 I epoxied the nail to the luan and ground the ends to match the shape and length of the latch arms.

The latch arms hook onto the receivers (one on each side), which I made from bent metal tabs. I had to countersink them into a mortise. This is one area where I strayed a bit from the published plans. 

I also put some paper shims under the stops that dictate the rotation of the latch arms. This was to provide clearance so there would be less friction and would hopefully prevent binding in the mechanism.

On the inside of the lower half, I pasted a special message for my daughter.

Step 5- Now onto the outside of the box. The original plans call for corner bosses to add strength and help hide how the box halves slide together. I decided to put molding along all the edges instead. The molding was hand made simple square corner molding which I made from some Redhart I got from the hardwood lumber place down in Amish Country. This 32x4.5 inch board cost me $19.

I'm not very good at making mitered corners, but I think these came out fairly well. I was very careful and crept up on the cut. Only once did I cut a little too much and had a loose sloppy fit, and I ended up remaking that piece. 

 You have to be careful where you apply your glue, especially on the side pieces. Make sure to only glue the molding to one face, so the adjacent face can slide away when the box opens.

  Chakte Kok is a beautiful red color, but I have heard that it will fade to brown fairly quickly (within an hour if left in sunlight). Now my entire shop is covered in fine bright red/pink sawdust!

 Each of the faces will receive a decorative piece, one of which is connected to the oak dowel that turns the locking mechanism. I found this nice thin panel of Spalted Maple and cut six disks out of it. I cut them on the bandsaw and smoothed out the shape with a disk sander.

(Why, yes, that IS my new ShopSmith Mark V with home made disk sander attachment. Thank you for asking!)

 I used thick CA glue to attach the five disks that are purely decorative. The sixth one, that opens the lock, I attached with epoxy.

Step 6- Finish up with some sanding and a coat of shellac. I would have given it a more substantial finish than a single coat of shellac, but it was literally 3pm on Christmas Day by the time I was finished, and I had been working on it for over 24 hours straight. A quick coat of shellac was all I could manage.

 This was my very first time making a puzzle box. It probably took me about 36 hours total. There was a bit of a learning curve. I'm sure a second one would go faster. I did enjoy this project. It was very satisfying once it was finished. I would have liked to have been able to show it off to a couple of people before giving it away.

I think this design lends itself well to modification and adornment. The trim and faces could easily be decorated in just about any style or motif. Definitely look for some Cthulhu themed boxes of this type in the near future!

UPDATE (10/03/2017):
Well, it took ten months, and she had to resort to reading this blog to figure it out, but my daughter finally got the box open! So now she can get started on solving the clue to the second stage which was hidden inside. Muhahahaha!